Writely : Iteration 1
Writing letters has its own form of complexity which demands lot of effort from the user and play an important part in motor skill development. Taking this into consideration, in our research we plan to use writing as a motor skill training exercise to help people with Fine motor skill disabilities. The training will be done using force feedback device called Haply integrated with our custom built software “Writely”.
In this experiment, we anticipate the challenge of finding people with hand motor skill disabilities and to tackle this we are planning to monitor the learning effect using the non-dominant hand. As it is less trained and requires a significant amount of brain activity and concentration. Previous research has also shown the usefulness of motor skill training using non dominant hand (Motor sequence learning, Acquisition of chopstick, Brain lateralisation and motor learning). So for this research we plan to simulate the learning effect of people with Fine motor skill disabilities by using non dominant hand and study the effect of force feedback device for motor exercise.
In our first iteration, we have started the project by exploring the initial designing concepts, literatures and hardware components that can be attach in the force feedback device (i.e. Haply). Here I have divided the work into seven sections according to the task done for Iteration 1:
- Literature Exploration
- Low Fidelity Designs
- Processing Experiments
- 3D Modelling and Sensors
- Challenges Faced
- Conclusion
- Work for Future Iteration
Literature Exploration
As there were a lot of new things to learn in this area. I went through multiple papers related to writing using Haptic devices, non-dominant hand learning and motor learning. Here I have briefly included some of the important findings from those papers.
Handwriting based research using Haptic devices
- In the paper Hand-writing Rehabilitation in the Haptic Virtual Environment, the letters are divided into Straight Line Based Character (i.e. A, E, F, H, I, K, L, M, N, T, V, W, X, Y, and Z) and Curved Line Based Characters (i.e. B, C, D, G, J, O, P, Q, R, S, and U) which includes curved lines in their strokes. These letters are divided based on its complexity to write the letters using the device.
- Previous research has been done using 3 DOF devices to teach Chinese characters (Stroke-based modeling, Comparing Haptic and Visual Training), Japanese characters (A Japanese Calligraphy Trainer), Arabic letters (Towards the development of haptic-based).
- The Hand-writing Rehabilitation in the Haptic Virtual Environment and The Effects of Tracing Prompts papers encourages the use of dotted lines, grids and traces in the background to provide guidelines to the users.
Non-dominant hand learning
- Non dominant hand learning as been studied for both adults and children (Writing with the non-dominant hand, Developmental differences in drawing performance).
- Most of the non-dominant hand studies uses Edinburgh Handedness Questionnaire to determine the preference of the hand.
- Different durations have been used to train the non dominant hand of the participants like 28-days, 10 days and 10 weeks.
- In the experiment, participants are usually constrained to write standard words or sentences like “The quick brown fox jumped over the lazy dog”.
Motor skill training
- The requirement of high degree of motor skills for writing has been discussed in multiple papers (Motor skill training assistance , The effect of fine and grapho-motor skill)
- In Technology-Assisted Rehabilitation paper, the feedbacks in the training based system has been divided into small trained, large trained and untrained
- In previous research, Noise/Disturbance in force feedback are found to be more helpful for motor skill exercise compare to guided force feedback (Exploring disturbance, Effects of haptic guidance and disturbance).
- There has also been experiments done using Repulsive force in motor learning (Effects of haptic guidance and disturbance, Augmented visual, auditory, haptic).
Low Fidelity Designs
After going through literature, I was encouraged to create a simple UI for Writely. Figure 1 shows the first sketch I created for the application.

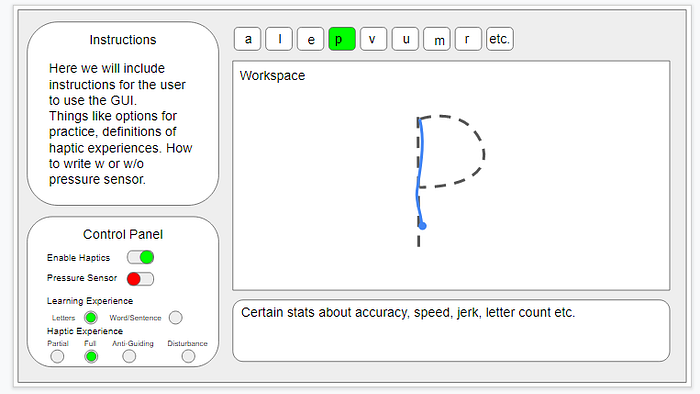
The Low fidelity Interface was created by going through Processing examples, literature and based on my understanding of How Haply worked. Firstly, I divided the UI into five different sections: Word to be written, Completed Letters, Current letter in practice, Real time movement and Metrics. The first three sections does exactly what the title says (for this I plan to use simple text fonts available in processing to create the letters). The Metrics section shows different quantitative values to the user based on their performance. While the real time section is the main part where the action takes place. It uses different shapes and dots to recreate guiding, anti-guiding, nudge and noisy feedback to the user.
I found that a lot of the Lab assignments and examples were based on using shapes so I decided to use shapes to create guiding and anti guiding options. I plan to use the Fisica library to add repelling and attracting force for the dots and triangles.
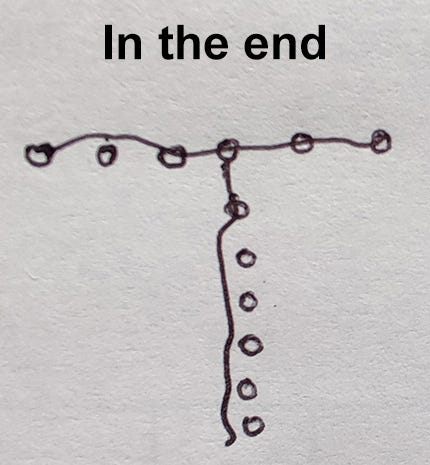
From previous studies, I found that there is a need for guidelines or references like grids or dots to help users track their movement and accuracy. Figure 2 shows the initial design of the guideline dots to track the accuracy of the user. The concept in this figure was used to create a grid in Processing which is shown in Figure 4.
While designing the UI, I was curious about the letter case, its size and the font to be used. Later I have decided to make the size of the letter comparative bigger than the normal letters as it will be easier to write. But in the process I will try to limit the movement of the users wrist so that it will not be a tiring process. Apart from that, small case letters will be chosen as people mostly use small cases while writing, and the font which looks like actual handwriting will be chosen for the motor exercise (e.g. indie flower font, Kalam, Daniel, etc).

Changes in UI
Bradley and I later had a discussion about our UI and have made changes to UI which is shown in Figure 3. The Word to be written, Completed Letters and Current letter were removed for now as we intend to start the UI with focus on letters alone beginning with only lower-case letters (as we mostly use lower-case letters in our writing). Also a different section at the top is added with a list of letters to constrain users from using difficult letters and words.
Apart from that, two separate sections are added : Instructions and Control Panel. The instruction section is used to provide some guidelines to the user to easily start off with using their Haply with Writely application. While the control panel section is still in development but for now we added a few buttons we think will be helpful for the users to use this application.
Processing Experiments
Exploring Processing Libraries
For this iteration I tried to experiment with different libraries available in processing and learn to implement it by using examples. For the available libraries, I found ControlP5, Dash-line, UI Booster and meter to be useful for our project.
Apart from that, I have also created some small applications in Processing to test the UI for Writely.
Building Text Grid

For the experiment I have built a small application in Processing with grids and a Large letter to replicate the interface for the Real Time Movement section. The Writely.pde file consists of the code I have written to create a large letter “E” with a background grid in processing. For now “Arial” font is used for the experiment but I plan to replace this with fonts which are more similar to human handwriting (e.g. indie flower font, Kalam, Daniel, etc). So, that it feels more natural to the user while writing the letters.
Building Mouse Tracker
As I have not received my Haply yet, I tried to build an application using the mouse pointer. The mouse movement was used to draw lines and track the user pointer movement and calculate its position, absolute speed and max speed. Also users can use Left /right mouse click to delete the previous lines/figures created on the screen.
This project was just done as an experiment to learn how the metrics can be used and understand how the line tracking works in Processing. Later, the mouse will be replaced with a Haply and other metrics like velocity, jerks, etc. will be calculated based on the value of pointer position and output from the pressure sensor.
3D Modelling and Sensors

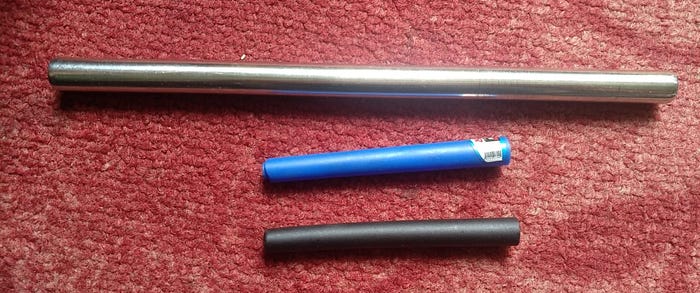
Bradley has experimented with multiple designs to build the right 3D pen for our project while Shariff is looking into ways to integrate the pressure sensors.
My team has been really helpful in explaining me the concept and have even provided me with the stl and gcode file for the 3D print model. I have tried to look for places to print the pen and have spent time on multiple emails , messages and calls. But I have found that most of the 3D printing labs in University are still closed while the commercial places don't usually work on small projects less than 100 grams.
Though I am still actively searching for a place to print, I have also made a backup option if I am not able to 3D print the pen. The backup option is to use a metallic straw or a pen handle as replacement for the 3D print model (I plan to make this decision after I receive my Haply).
Challenges Faced
- For this first iteration, I had to make many assumptions for the UI and the technical aspects as I have not yet received my Haply.
- There were challenges to find terminology for anti-guiding force to be used in our application. Eventually, we found few papers which uses “Repulsive force” for motor skill training, but there still lacks contribution in this area.
- Lot of time has been spent searching for places to 3D print the pen model. But due to the model size and COVID-19 situation it has been difficult to find a reliable 3D printing store.
- There were many deprecated libraries in Processing and also some of the concepts were difficult to implement in processing due to its programming structure.
- It is difficult to collaboratively work in GitHub using Processing .
Conclusion
The main challenge was going forward with the project without the Haply but my team was really helpful in explaining me about the components of Haply and its concepts. Overall, in this first iteration we were able to got through useful literatures, add some external handle and sensor in the Haply and build initial UI for the Writely application. Also the available literature in the field was helpful to build the concepts and take initiatives on how to approach the project. Later in our future iteration we plan to build on this foundation to make the application usable for the participants of our study.
Work for Future Iteration
- We are planning to use quantitative metrics to monitor/track the users improvement and writing pattern. For this, we plan to further explore how to track metrics like acceleration, velocity and accuracy using Haply.
- In our experiment, we plan to give an option to the user to train using four different force feedback. So, in our next iteration we plan to integrate at least two of the force feedback. Most probably guiding and noise based force feedback.
- We now have a better understanding of what we want to achieve from our project and How we plan to approach our experiments. So will also start with our initial draft for Introduction, motivation and literature section for our final paper.
- We will further try to improve the design of our Interface. As there will be changes based on letter size, force feedback implementation and How we plan to integrate the pressure sensor.
